Why it might be a good idea to save
RAW format files from your camera.
This is not intended to be a tutorial on RAW photo file processing or a detailed accurate scientific explanation of the the way RAW and JPEG files are produced it is just simply a quick high level overview that may give a flavour of what RAW files are and why it may be a good idea to save them on your camera. Even if you don't know what to do with them now they may turn out to be very useful later if you decide RAW processing is for you. If you can't be bothered to read anymore then just jump to the bottom of the page to see some simple before and after shots to see the sort of difference it can make.
When I went on my sailing trip in the yacht Callisto I took with me my first proper digital mirrorless camera, a Panasonic Lumix G6. I didn't know how to use it properly and didn't have an instruction manual with me on the yacht so it was just left to sort itself out in "Intelligent Auto Mode". However, I had heard RAW processing mentioned before I went and luckily I had changed the options in my camera to store BOTH RAW and JPEG format files for every photo before I went. That turned out to be a great move because a couple of years after the trip when I discovered the joys of RAW processing I was able to go back to the RAW files I had stored from that once in a lifetime trip and salvage many of the photos!
As the name implies digital cameras don't use film to produce a photo they just produce a file of data from the output of a sophisticated light sensor. Instead of processing a film to get the finished photo they process the data file using complicated algorithms to make sense of the jumble of digital signals and magically produce a photo file, the ubiquitous JPEG format file that most people are familiar with, those files ending in .JPG or .jpg or .jpeg that you download from your camera.
However, the JPEG file (stands for the "Joint Photographic Experts Group" which devised the file format) is a compromise based on what the camera, actually a small computer, thinks the photo should look like calculated using the exposure settings of the camera at the time and the standard algorithm that the software engineers designed to process the signals. The JPEG file, to save space, is a "lossy" compressed file so basically once the camera has decided what the JPEG should contain it effectively throws away any extraneous data from the raw output of the sensor so it is gone for good. You may be able to enhance the JPEG photo to an extent later, by using Photoshop or similar, but you will only be able to enhance what remains, you won't have all of the data the camera sensor originally captured. If you have a camera that has a "Scenes" or "Effects" mode e.g. "Sepia toned", or "Vivid" or "Miniature/Toy Camera", then this is just applying a different algorithm to the original RAW file and processing it in a different way to create a JPEG file. What one camera manufacturer deems to be a "Standard" image may equate to the "Vivid" effect of another manufacturer/camera. It is not "Right" or "Wrong" just different but in either case may not have been the way we, as photographers, actually intended it to look or the way our eyes actually saw the scene at the time.
However some advanced compact cameras and almost all DSLR and Mirrorless system cameras have the ability to save RAW format files as well as, or instead of, JPEG files. The sensors in most modern digital cameras are small miracles of engineering and have a very wide exposure range (what is known as dynamic range and for most modern cameras this is somewhere between 11 and 15 EV). This means that they can record a very wide range of light levels from details hidden in shadows to details contained in very bright highlights. The RAW files contain all of this captured information (so are larger than JPEG files) and it is effectively these RAW files that the camera uses to produce a JPEG file in the first place before throwing the RAW data away.
If we save these RAW files then develop/process them ourselves, with some special RAW file processing software, we can decide exactly how our final photo appears and what details we want to display. In effect we are using a digital darkroom to develop the photos. This allows us to take control of our photographs away from the camera algorithm/software engineer and instead control the output to suit ourselves and make full use of the incredible abilities of modern digital sensors. Moreover, instead of just taking an average value over the whole photo, for instance lightening the whole picture, we can choose for example to selectively boost (lighten/reveal) the hidden details in the shadow and at the same time darken the highlights e.g.sky/clouds, to reveal details in them as well. This can be especially useful when processing photos of sunsets where it can be tricky to get the exposure right in camera and even if you do you will often end up with either a burnt out sun or a dark silhouette landscape. The software also enables us to control the level of digital sharpening in the photos, colour tones and saturation, for each individual colour not just overall white balance, level of digital noise reduction applied (a topic of it's own!), etc. "Post Processing" of your photos then becomes an art form in it's own right. Most professional photographers will "Post Process" their photographs as part of their standard workflow to get the best out of them which is why few of our own "straight out of the camera" jpegs end up looking like those magazine cover photos. Of course it is still important to get our exposures as right as possible in the camera for the original jpeg in the first place to give us the optimum starting position for the RAW processing.
There are many software applications available for RAW and Post Processing digital photo files ranging from free "Open Source" software (e.g. "Rawtherapee" and "Darktable") to eye wateringly expensive software packages. You may also find that some cameras come with a free application that can process RAW files although possibly in a more limited way. At the lower end of the price range of paid for software packages I found "Affinity Photo" from Serif is remarkably powerful but at a very reasonable price and since Canva took over from Serif, Affinity Photo (in fact the whole of Affinity Studio) is now available to download for FREE! You can also effectively buy a RAW software processing software service on-line Something like" Adobe Lightroom", used by many Pro photographers, for a monthly fee so you can try out software just for a month for the price of a round of drinks. Most RAW processing software has the ability to save "Presets" so once you have found a "look" that you like you can save it as a "Preset" and then apply all those settings to a RAW file by one simple click of a button so making RAW processing a very quick and easy process. You can then just apply individual extra tweaks to each photo if/where necessary. Saving different presets for different settings, or different cameras, makes for very quick processing and also allows us to easily match the colour settings and "look" from multiple different cameras if we have the luxury of having more than one and need a consistent look.
Personally as I often used cameras with a small Micro Four Thirds (M43) sensors, which are more prone to displaying digital noise at higher ISO levels, I currently use the DXO Photolab 9 Elite software package most of the time as the "DeepPRIME" Denoising technology built into it is extremely good, considered by many to be one of the best, at minimising digital noise, that fuzzy blurriness you can see in photographs when taken in dim/dark conditions at high ISO, while at the same time preserving image detail. Works with Fujifilm X-Trans sensors as well now. If you cannot stretch to the cost of DXO Photolab Elite then DXO PureRAW 6 has the same excellent de-noising capabilty but it doesn't have all of the other editing features so you will need additional software for further processing. For my purposes DXO Photolab Elite covers most of my photo editing needs as a one stop solution although it doesn't provide Photo Stitching (e.g. for making panoramas from multiple shots) or Photo Stacking capabilities (e.g.for Astro Photography). If I need Photo Stitching or Stacking capability I generally do all of my processing and de-noising in DXO Photolab Elite first then output full size TIFF images (not compressed so more detail than JPEGs) and then Stitch or Stack them in the Free version of Canva Affinity Photo and output the final image from Affinity Photo in whatever format I require. You could do all of your RAW processing for free in Affinity Photo BUT it does not have the same level of de-noising capability as DXO Photolab. The best time to buy DXO Photolab Elite is usually around Black Friday as DXO tend to release a new version of the software just before Black Friday each year (usually adding a few new features or improving on existing features) and then offer a special Black Friday discount on the purchase price.
Below are a few simple examples of the difference it can make processing a RAW file when compared to the original straight out of camera JPEG file just to whet your appetite and maybe give you the incentive to find out more and have a go yourself (masses of information and youtube video tutorials available on the internet). The results don't have to be as obvious as the examples below, it can just be the subtle raising of a few shadows or lowering of a few highlights that can make all the difference to a photo or not changing anything other than de-noising an image. For me, buying a good RAW processing software package was like giving myself an upgraded camera, the results were that good!
Below is the JPEG file the camera produced for an accidentally under exposed photograph
This is how the camera thought I wanted the photo to look based on the exposures settings at the time and processed by the JPEG algorithm programmed by the software engineers. Once processed any unused sensor data is "Thrown away"/"lost for ever" to allow the JPEG to be saved as a smaller file.
And this is the exact same photograph manually processed by me from the RAW file instead showing just how much data the Sensor had really captured and what could be recovered. Wouldn't you have been relieved if that had been a wrongly exposed wedding photo or other once in a lifetime shot!
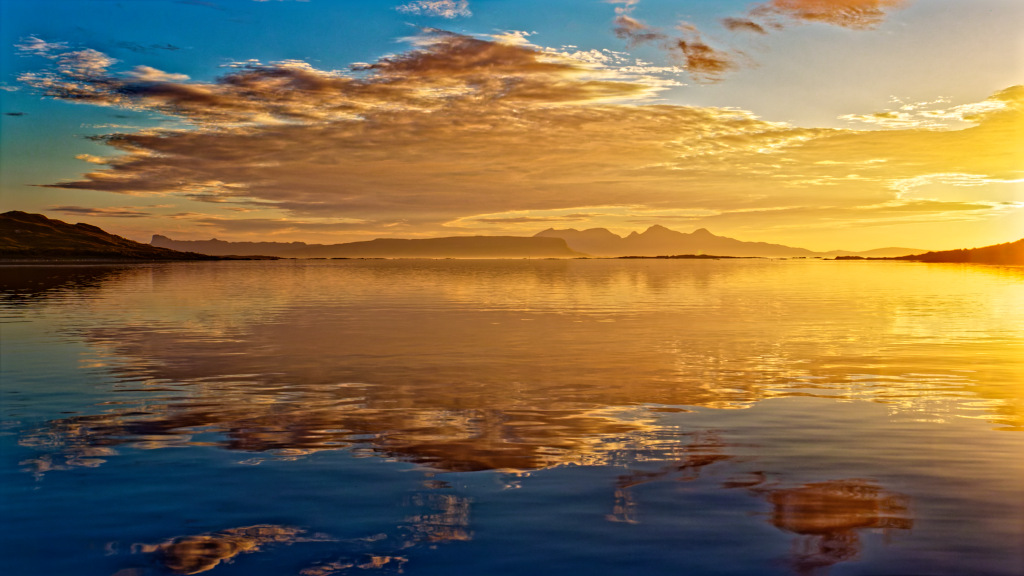
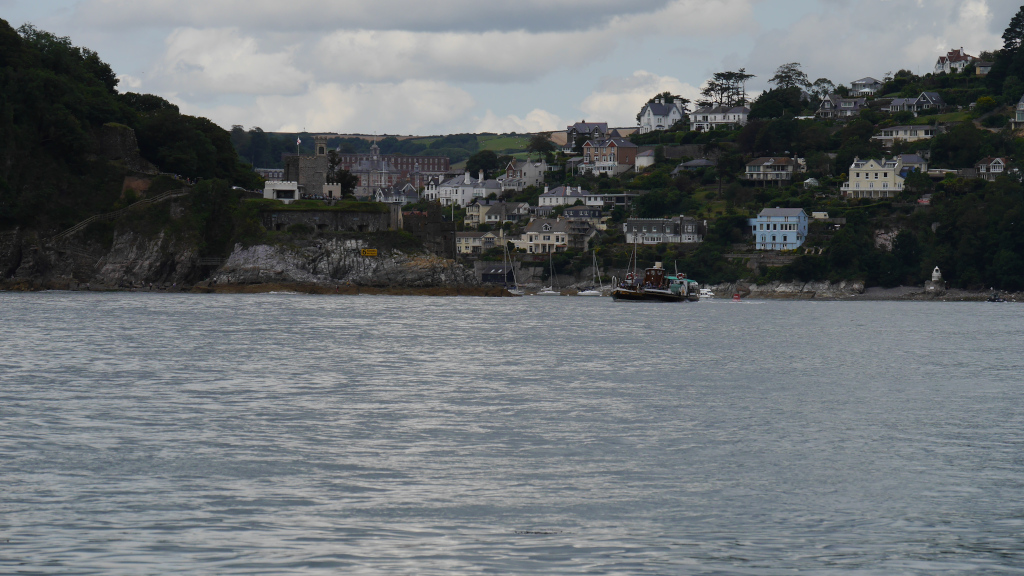
The example below shows a photo taken from a yacht entering Dartmouth Harbour. The automatic exposure system of the camera had metered for all of the light being reflected off the sea and the large patch of sky in the photo rendering some of the shoreline detail dark and indistinct in shadow. I had no time to set the camera up for the preferred exposure as I was busy navigating into a harbour after sailing for nearly 10 hours (and at that time I didn't know how to operate the camera properly anyway so just left it in auto mode!). This has produced a fairly flat and bland looking view.
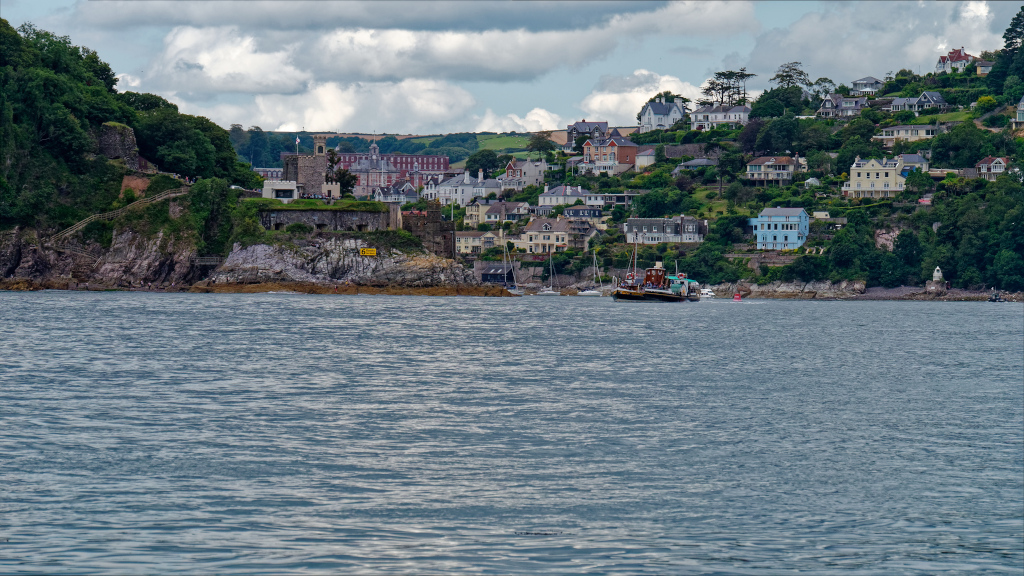
The photo below has been processed from the RAW file of the exact same photo as above to bring out more of the detail that the camera had actually captured. Raising the brightness of the shadow areas and reducing the brightness of some of the highlights. Also sharpened a little and fine contrast and colour saturation increased bringing out the details of the clouds to give a photograph with more "pop". This isn't "photoshopped", all that detail was in there it just needed to be let out and the photo presented more like our eyes were able to see it!
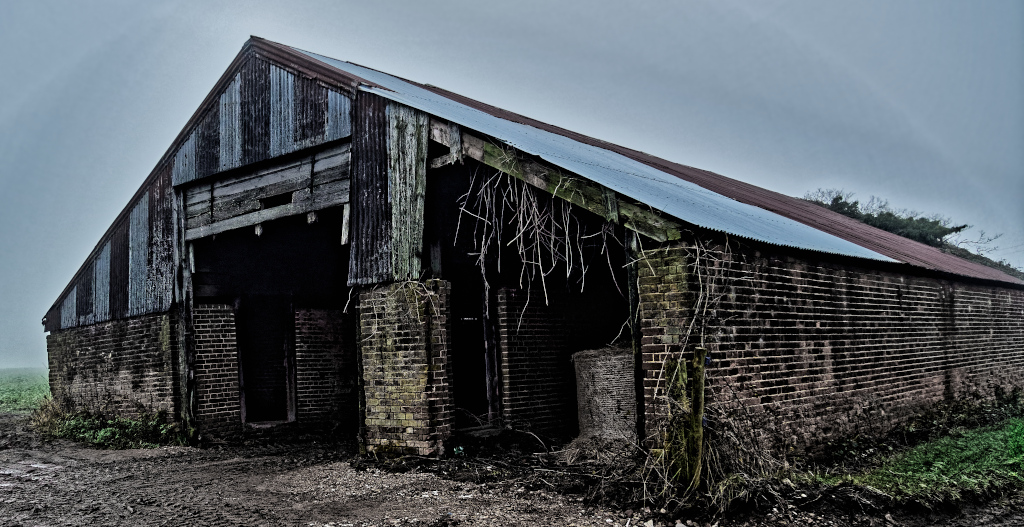
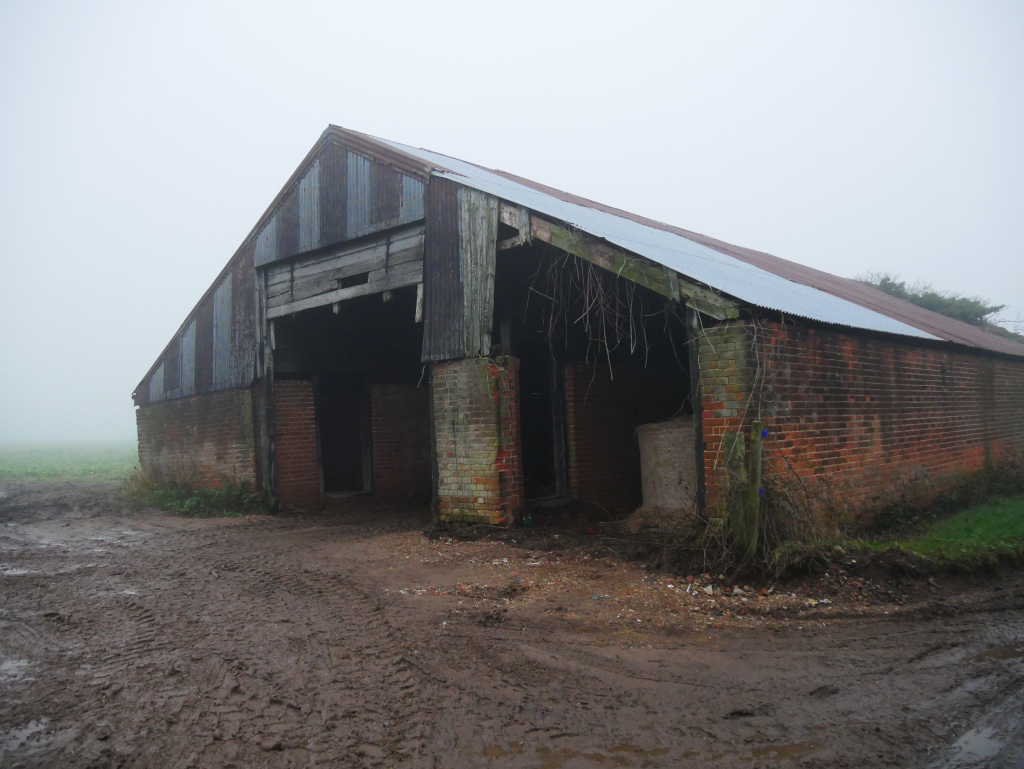
Finally just getting a bit artistic. This was a photo of an old barn taken on a cold, drab and foggy December day. In this case there is nothing actually wrong with the original JPEG file, the camera interpreted it basically just as the scene really looked.
But now below I have deliberately manually over processed it using the RAW file to produce a more dramatic looking picture.
Slightly cropped, heavily sharpened and different colour channels selectively saturated or desaturated to give a more stark gritty look.